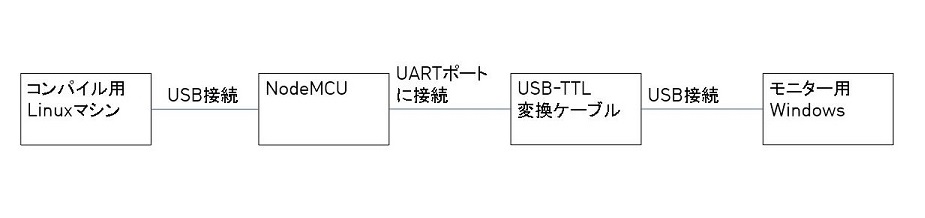
$ sudo make flash && sudo
picocom -b 115200 /dev/ttyUSB0
esptool.py -p /dev/ttyUSB0 --baud 115200 write_flash -fs
16m -fm qio -ff 40m \
0x0
../../bootloader/firmware_prebuilt/rboot.bin 0x1000
../../bootloader/firmware_prebuilt/blank_config.bin
0x2000 ./firmware/http_get.bin
esptool.py v1.2
Connecting...
Running Cesanta flasher stub...
Flash params set to 0x0030
Writing 4096 @ 0x0... 4096 (100 %)
Wrote 4096 bytes at 0x0 in 0.4 seconds (89.4 kbit/s)...
Writing 4096 @ 0x1000... 4096 (100 %)
Wrote 4096 bytes at 0x1000 in 0.4 seconds (89.4
kbit/s)...
Writing 262144 @ 0x2000... 262144 (100 %)
Wrote 262144 bytes at 0x2000 in 22.7 seconds (92.3
kbit/s)...
Leaving...
picocom v2.2
port is :
/dev/ttyUSB0
flowcontrol : none
baudrate is : 115200
parity is : none
databits are : 8
stopbits are : 1
escape is : C-a
local echo is : no
noinit is : no
noreset is : no
nolock is : no
send_cmd is : sz -vv
receive_cmd is : rz -vv -E
imap is :
omap is :
emap is :
crcrlf,delbs,
Type [C-a] [C-h] to see available commands
Terminal ready
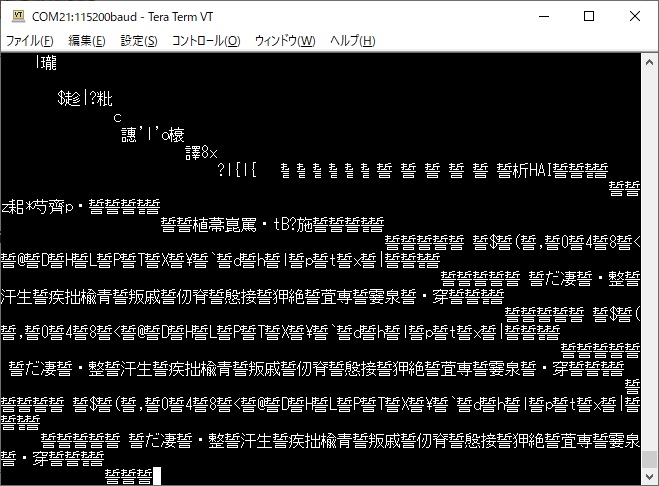
Booting rom 0.
WA�D9 �bould not initialize sysparams (1)!
�����m��
��Ym 5��
��?�חk?}�P�Ox3fff3818, prio:12, stack:200
ESP-Open-SDK ver: 0.0.1 compiled @ Feb 10 2019 11:46:32
phy ver: 273, pp ver: 8.3
SDK version:0.9.9
mode : sta(84:0d:8e:8c:f4:00)
add if0
HTTP get task starting...
Running DNS lookup for httpbin.org...
DNS lookup failed err=202 res=0
scandone
Running DNS lookup for httpbin.org...
DNS lookup failed err=202 res=0
add 0
aid 7
cnt
connected with aterm-e625c0-g, channel 11
dhcp client start...
Running DNS lookup for httpbin.org...
DNS lookup failed err=202 res=0
Running DNS lookup for httpbin.org...
DNS lookup failed err=202 res=0
ip:192.168.10.186,mask:255.255.255.0,gw:192.168.10.1
Running DNS lookup for httpbin.org...
DNS lookup succeeded. IP=52.201.75.180
... allocated socket
... connected
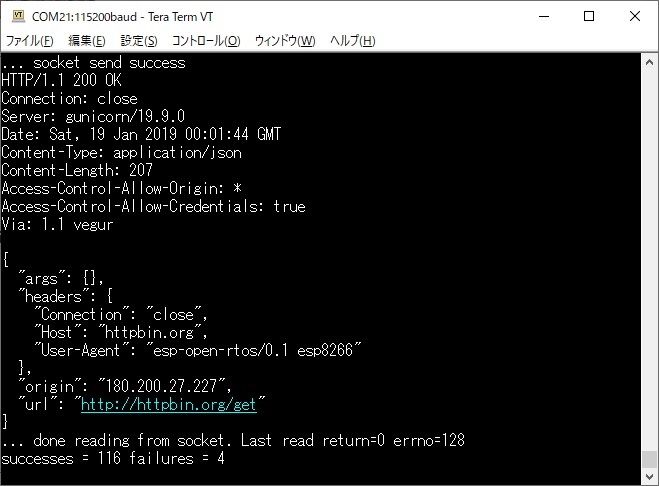
... socket send success
HTTP/1.1 200 OK
Connection: close
Server: gunicorn/19.9.0
Date: Sun, 10 Feb 2019 02:54:28 GMT
Content-Type: application/json
Content-Length: 207
Access-Control-Allow-Origin: *
Access-Control-Allow-Credentials: true
Via: 1.1 vegur
{
"args": {},
"headers": {
"Connection": "close",
"Host": "httpbin.org",
"User-Agent": "esp-open-rtos/0.1
esp8266"
},
"origin": "180.200.27.227",
"url": "http://httpbin.org/get"
}
... done reading from socket. Last read return=0
errno=128
successes = 1 failures = 4
|