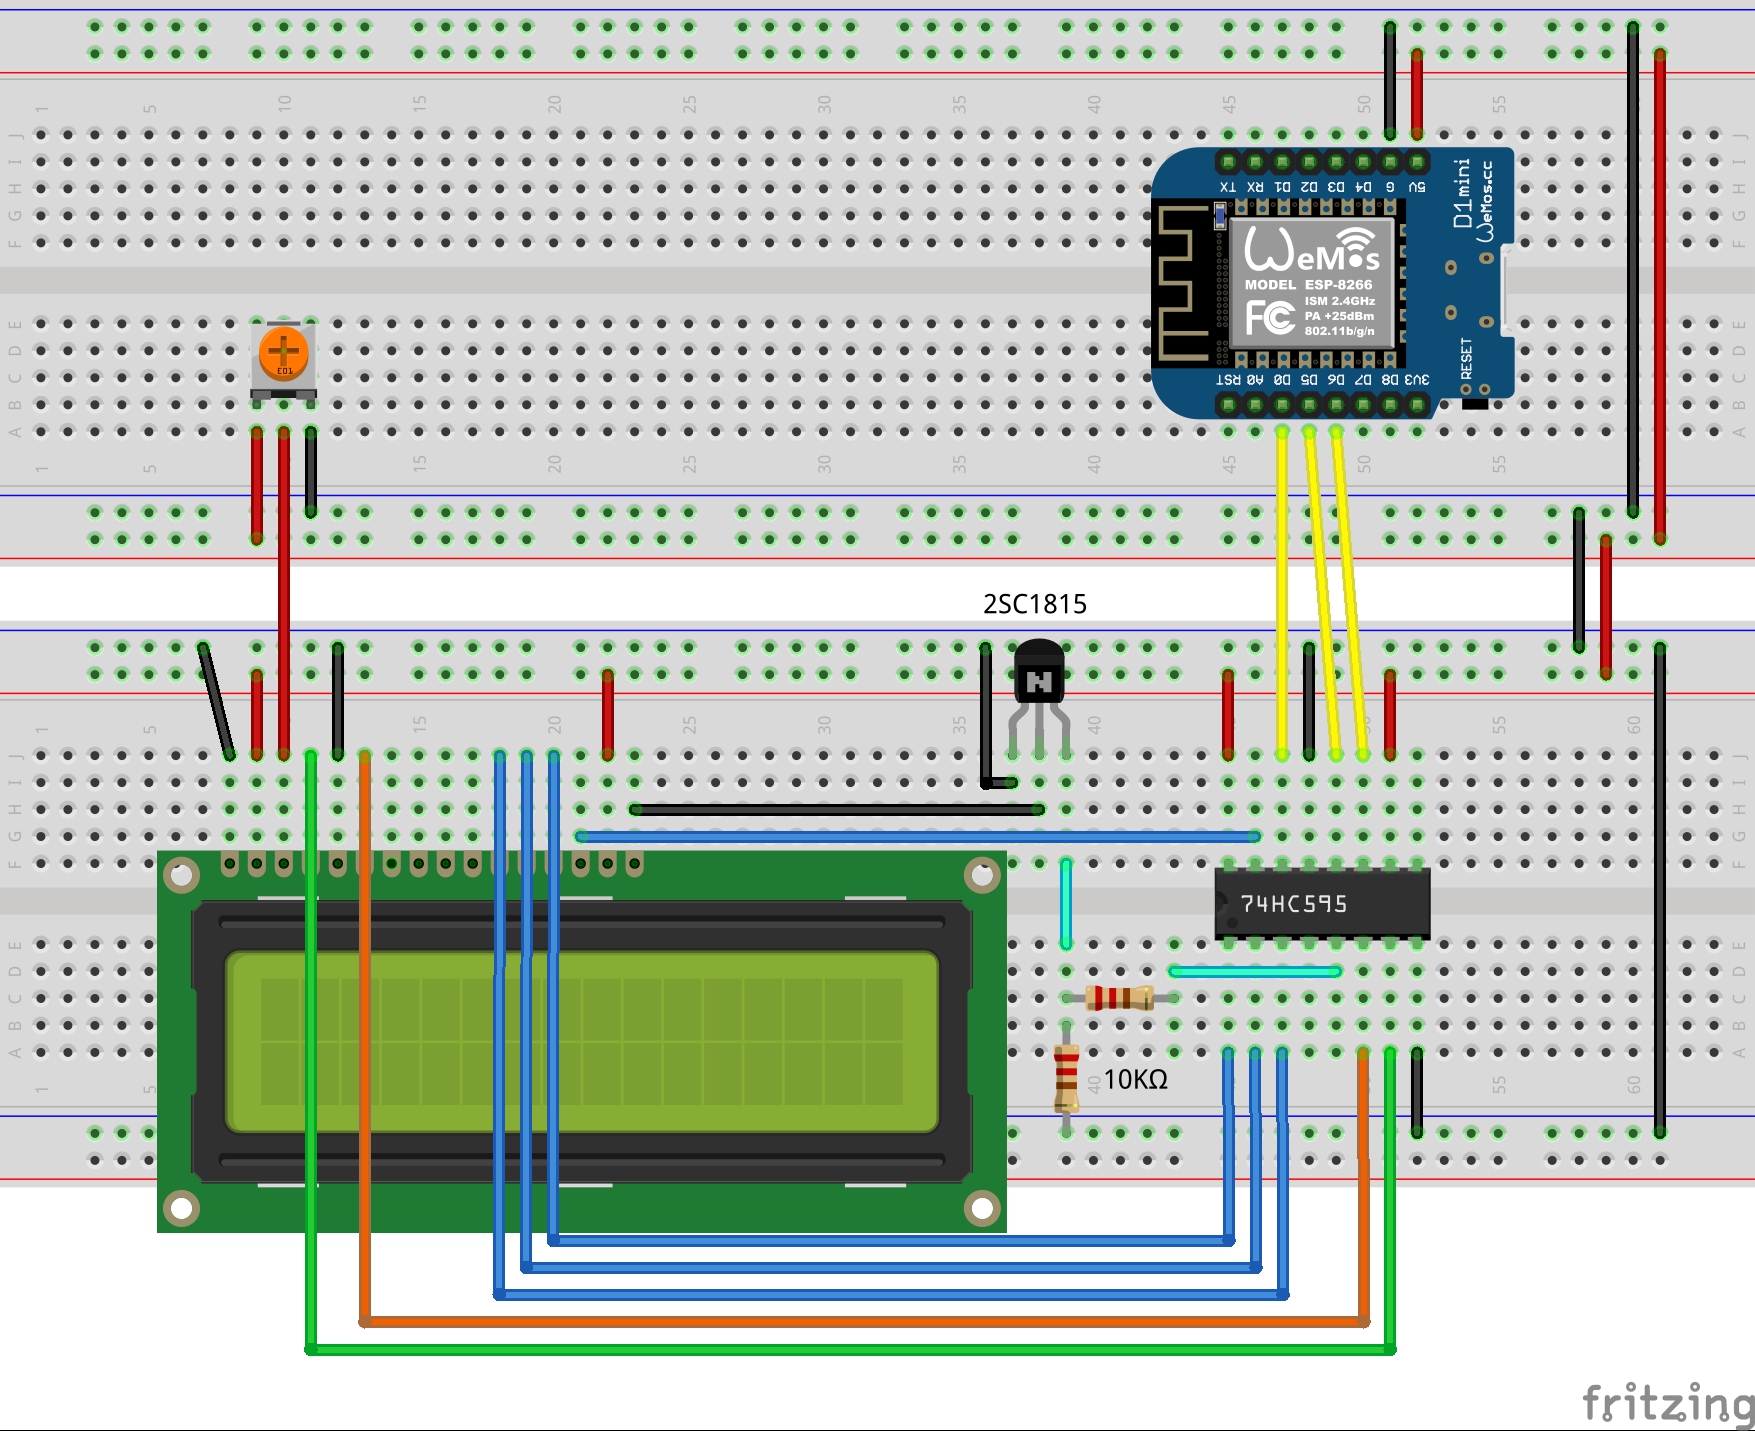
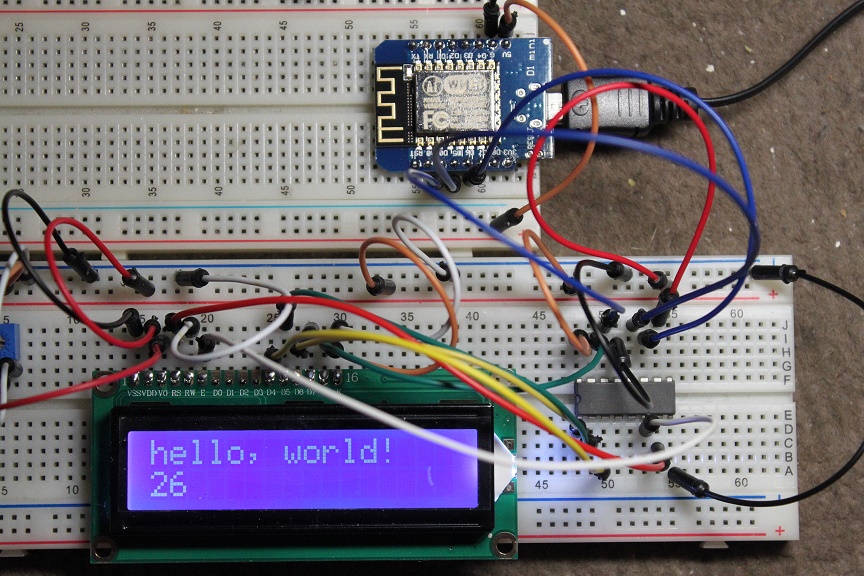
WeMosを使ってみる

1602LCD+74HC595


1602のLCDを使うときは定番の74HC595(シフトレジスター)を使ってみます。
結線は以下のようになります。
74HC595から供給できるのは20mA程度です。
74HC595からバックライトのアノード側に直接給電しても制御できますが、
トランジスタを使ってバックライトのカソード側をSWした方が安定して動きます。


WeMosのスケッチは以下の通りです。
こちらにある ShiftLCDライブラリを使っています。
/*
 * 1602 LCD Sample with ShiftLCD
 * https://github.com/Chris--A/ShiftLCD_Fixed
 *
 * 74HC595-----1602LCD-----WeMos
 *              GND   ---- GND
 *              VCC   ---- 5V
 *              VE    ---- Variable resistor
 * QH     ----- RS
 *              R/W   ---- GND
 * QG     ----- EN
 * QD     ----- D4
 * QC     ----- D5
 * QB     ----- D6
 * QA     ----- D7
 *              LED+  ---- 5V
 *              LED-  ---- GND
 * SER                ---- D0(GPIO_16)
 * RCLK               ---- D5(GPIO_14)
 * SRCLK              ---- D6(GPIO_12)
 *
 */
#include <ShiftLCD.h>

// initialize the library with the numbers of the interface pins
// SerialDataIn, ShiftClock, LatchClock
ShiftLCD lcd(16, 12, 14);

void setup() {
  // set up the LCD's number of rows and columns:
  lcd.begin(16, 2);
  // Print a message to the LCD.
  lcd.print("hello, world!");
}

void loop() {
  // set the cursor to column 0, line 1
  // (note: line 1 is the second row, since counting begins with 0):
  lcd.setCursor(0, 1);
  // print the number of seconds since reset:
  lcd.print(millis() / 1000);
}


あっさりと動きました。
BackLightの制御もできますが、以下のスケッチを動かすと表示がおかしくなります。
/*
 * 1602 LCD Sample with ShiftLCD
 * https://github.com/Chris--A/ShiftLCD_Fixed
 *
 * 74HC595-----1602LCD-----WeMos
 *              GND   ---- GND
 *              VCC   ---- 5V
 *              VE    ---- Variable resistor
 * QH     ----- RS
 *              R/W   ----- GND
 * QG     ----- EN
 * QD     ----- D4
 * QC     ----- D5
 * QB     ----- D6
 * QA     ----- D7
 *              LED+  ----- 5V
 *              LED-  ----- GND
 * SER                ----- D0
 * RCLK               ----- D5
 * SRCLK              ----- D6
 *
 */
#include <ShiftLCD.h>

// initialize the library with the numbers of the interface pins
// SerialDataIn, ShiftClock, LatchClock
ShiftLCD lcd(16, 12, 14);

void setup()
{
  // set up the LCD's number of rows and columns:
  lcd.begin(16,2);
  // Output Hello, World!
  lcd.print("Hello, World!");
}

void loop()
{
  // Turn the backlight on
  lcd.backlightOn();
  lcd.setCursor(0, 1);
  lcd.print("Backlight ON ");
  delay(1000);
  // Turn the backlight off
  lcd.backlightOff();
  lcd.setCursor(0, 1);
  lcd.print("Backlight OFF");
  delay(1000);
}

そこでライブラリソース(ShiftLCD.cpp)を一部修正してみました。
【オリジナル】
(前略)

// This will turn the backlight on
void ShiftLCD::backlightOn(void) {
    _backlight = LCD_BL_PIN;
    updateBacklight();
}

// This will turn the backlight off
void ShiftLCD::backlightOff(void) {
    _backlight &= ~LCD_BL_PIN;
    updateBacklight();
}

(後略)

【修正後】
(前略)

// This will turn the backlight on
void ShiftLCD::backlightOn(void) {
    _backlight = LCD_BL_PIN;
//    updateBacklight();
}

// This will turn the backlight off
void ShiftLCD::backlightOff(void) {
    _backlight &= ~LCD_BL_PIN;
//    updateBacklight();
}

(後略)

Arduino-IDEを再起動しないと、ライブラリの修正は反映されないので、注意してください。

次回は、これも1602のLCDを使うときは定番のPCF8574(IOエクスパン ダー)を試してみます。