OrangePi-PCを使ってみる

オンボードの赤外線受信(Ubuntu Xenial編)

OrangePi-PC にはUbuntu xenialのイメージも公開されていますが、DebianとUbuntuでは少し手順が違うので紹介します。

lircパッケージのインストール

最初にlircパッケージをインストールします。
$ sudo apt update
$ sudo apt install lirc

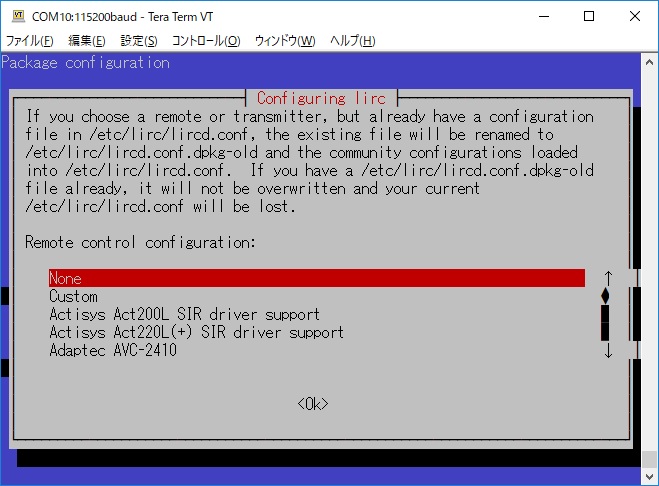
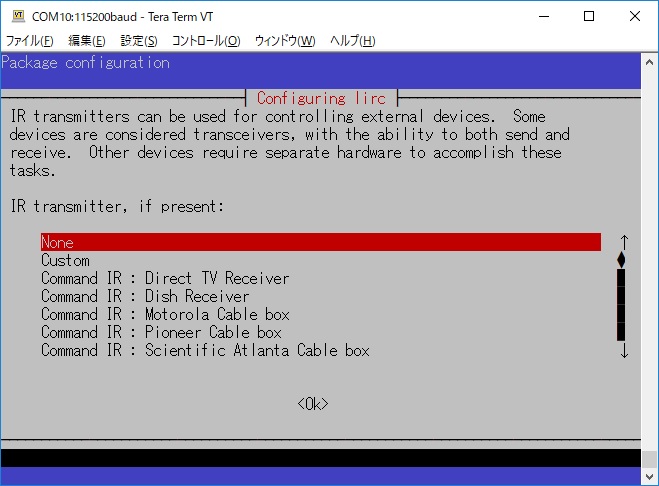
Ubuntuではパッケージインストールの途中で以下の2つの画面が表示されるようになりました。
どうやら市販されているリモコンを選べるようですが、今回はリモコンの学習を行いますので
どちらの画面でもNoneを選びます。


カーネルモジュールのロード

Debian と Ubuntuでは「/etc/lirc/hardware.conf」の書式が違います。
この違いはこ ちらで紹介されています。
Ubuntuの場合、「/etc/lirc/hardware.conf」を以下の様に変更して再起動します。
# /etc/lirc/hardware.conf
#
#Chosen Remote Control
REMOTE="None"
REMOTE_MODULES="sunxi_cir"
REMOTE_DRIVER="default"
REMOTE_DEVICE="/dev/lirc0"
REMOTE_SOCKET=""
REMOTE_LIRCD_CONF=""
REMOTE_LIRCD_ARGS=""

#Chosen IR Transmitter
TRANSMITTER="None"
TRANSMITTER_MODULES=""
TRANSMITTER_DRIVER=""
TRANSMITTER_DEVICE="/dev/null"
TRANSMITTER_SOCKET=""
TRANSMITTER_LIRCD_CONF=""
TRANSMITTER_LIRCD_ARGS=""

#Disable kernel support.
#Typically, lirc will disable in-kernel support for ir devices in order to
#handle them internally.  Set to false to prevent lirc from disabling this
#in-kernel support.
#DISABLE_KERNEL_SUPPORT="true"

#Enable lircd
START_LIRCD="true"

#Don't start lircmd even if there seems to be a good config file
#START_LIRCMD="false"

#Try to load appropriate kernel modules
LOAD_MODULES="true"

# Default configuration files for your hardware if any
LIRCMD_CONF=""

#Forcing noninteractive reconfiguration
#If lirc is to be reconfigured by an external application
#that doesn't have a debconf frontend available, the noninteractive
#frontend can be invoked and set to parse REMOTE and TRANSMITTER
#It will then populate all other variables without any user input
#If you would like to configure lirc via standard methods, be sure
#to leave this set to "false"
FORCE_NONINTERACTIVE_RECONFIGURATION="false"
START_LIRCMD=""

修正が終わったら一旦リブートします。
以下のコマンドでこれらの赤外線関係のモジュールが表示されます。
$ lsmod
Module                  Size  Used by
ir_lirc_codec           3677  0
lirc_dev                7834  1 ir_lirc_codec
ir_mce_kbd_decoder      2885  0
ir_sanyo_decoder        1480  0
ir_sony_decoder         1422  0
ir_jvc_decoder          1452  0
ir_rc6_decoder          1941  0
ir_rc5_decoder          1412  0
ir_nec_decoder          1556  0
sunxi_cir               1601  0

以下コマンドでこれらのデバイスが表示されます。
$ ls /dev/lirc*
/dev/lirc0  /dev/lircd  /dev/lircd1

使えるリモコンを探す

手元のリモコンが使えるかどうか確認します。
以下のコマンドを実行し、リモコンを発射します。
$ mode2 -d /dev/lirc0
space 16777215
pulse 9152
space 4552
pulse 576
space 592
pulse 520
space 624
pulse 552

space pulse がずらずら表示されたらOrangePi PCで使うことができるリモコンです。

lircサービスの停止

リモコンの学習を行うときには、lircサービスを止める必要が有ります。
$ sudo /etc/init.d/lirc stop
[ ok ] Stopping lirc (via systemctl): lirc.service.

$ sudo systemctl status lirc.service
● lirc.service - LSB: Starts LIRC daemon.
   Loaded: loaded (/etc/init.d/lirc)
   Active: inactive (dead) since Sat 2018-11-17 07:48:04 CET; 2s ago
  Process: 1137 ExecStop=/etc/init.d/lirc stop (code=exited, status=0/SUCCESS)
  Process: 928 ExecStart=/etc/init.d/lirc start (code=exited, status=0/SUCCESS)

Nov 17 07:34:06 orangepizero lircd-0.9.0-pre1[950]: lircd(default) ready, usi...
Nov 17 07:34:06 orangepizero lirc[928]: Starting remote control daemon(s) : ....
Nov 17 07:34:07 orangepizero systemd[1]: Started LSB: Starts LIRC daemon..
Nov 17 07:34:40 orangepizero lircd-0.9.0-pre1[950]: accepted new client on /v...
Nov 17 07:34:45 orangepizero lircd-0.9.0-pre1[950]: removed client
Nov 17 07:45:19 orangepizero lircd-0.9.0-pre1[950]: accepted new client on /v...
Nov 17 07:45:25 orangepizero lircd-0.9.0-pre1[950]: removed client
Nov 17 07:48:04 orangepizero systemd[1]: Stopping LSB: Starts LIRC daemon....
Nov 17 07:48:04 orangepizero lirc[1137]: Stopping remote control daemon(s): ....
Nov 17 07:48:04 orangepizero systemd[1]: Stopped LSB: Starts LIRC daemon..
Hint: Some lines were ellipsized, use -l to show in full.

リモコンの学習

以下のコマンドでリモコンの学習を行います。
ここで注意する点があります。
コマンドの引数に「-n」をつけないと、あらかじめ定義されている名前でしかコードを登録できません。
事前に定義されている名前は「irrecord -l」で確認することができます。
$ sudo irrecord -n -d /dev/lirc0 my.conf

ずらずら表示される

Please send the finished config files to <lirc@bartelmus.de> so that I
can make them available to others. Don't forget to put all information
that you can get about the remote control in the header of the file.

Press RETURN to continue.(Enterキー)

Now start pressing buttons on your remote control.

It is very important that you press many different buttons and hold them
down for approximately one second. Each button should generate at least one
dot but in no case more than ten dots of output.
Don't stop pressing buttons until two lines of dots (2x80) have been
generated.

Press RETURN now to start recording.(Enter キー)
(リモコンのボタンを押し続ける 同じボタンでOK)
................................................................................
Found gap: 129204
Please keep on pressing buttons like described above.
(リモコンのボタンを押し続ける 適当に押すボタンを変える)
................................................................................
Space/pulse encoded remote control found.
Signal length is 71.
Found possible header: 9005 4476
Found trail pulse: 566
No repeat code found.
Signals are space encoded.
Signal length is 34
Now enter the names for the buttons.

Please enter the name for the next button (press <ENTER> to finish recording)
OK(登録するボタンの名前)

Now hold down button "OK".
(OKボタンとして登録するボタンを1回だけ押す)

Please enter the name for the next button (press <ENTER> to finish recording)
UP(登録するボタンの名前)

(UPボタンとして登録するボタンを1回だけ押す)

Now hold down button "UP".

Please enter the name for the next button (press <ENTER> to finish recording)(Enterキー)
Checking for toggle bit mask.
Please press an arbitrary button repeatedly as fast as possible.
Make sure you keep pressing the SAME button and that you DON'T HOLD
the button down!.
If you can't see any dots appear, then wait a bit between button presses.

Press RETURN to continue.(Enterキー)
(適当なボタンを押し続ける)
.............................
No toggle bit mask found.
Successfully written config file.

my.conf のファイルができます。

コンフィグファイルの修正

出来上がった my.conf は一部修正した方が使いやすいです。

<修正前>
# Please make this file available to others
# by sending it to <lirc@bartelmus.de>
#
# this config file was automatically generated
# using lirc-0.9.0-pre1(default) on Wed Nov 30 09:07:32 2016
#
# contributed by
#
# brand:                       my.conf
# model no. of remote control:
# devices being controlled by this remote:
#

begin remote

  name  my.conf
  bits           16
  flags SPACE_ENC|CONST_LENGTH
  eps            30
  aeps          100

  header       9018  4453
  one           592  1651
  zero          592   530
  ptrail        591
  pre_data_bits   16
  pre_data       0xFF
  gap          141030
  toggle_bit_mask 0x0

      begin codes
          OK                       0xA857
          UP                       0x02FD
          DOWN                     0x9867
          LEFT                     0xE01F
          RIGHT                    0x906F
          TOP-LEFT                 0xA25D
          TOP-CENTER               0x629D
          TOP-RIGHT                0xE21D
      end codes

end remote


<修正後>
赤字の部分が修正したところです。
name は何でもいいですが、私はどのリモコンか分かりやすい名前(今回はコダックのフォトフレームに付いてきたリモコン)を付けました。
# Please make this file available to others
# by sending it to <lirc@bartelmus.de>
#
# this config file was automatically generated
# using lirc-0.9.0-pre1(devinput) on Fri Mar 18 12:44:29 2016
#
# contributed by
#
# brand:                       my.conf
# model no. of remote control:
# devices being controlled by this remote:
#

begin remote

  name  KODAC
  bits           16
  flags SPACE_ENC|CONST_LENGTH
  eps            30
  aeps          100

<以下、省略>

lircサービスの起動

コンフィグファイルを所定の場所にコピーし、lircサービスを開始します。
$ sudo cp my.conf /etc/lirc/lircd.conf

$ sudo /etc/init.d/lirc start
[ ok ] Starting lirc (via systemctl): lirc.service.

$ sudo systemctl status lirc.service
● lirc.service - LSB: Starts LIRC daemon.
   Loaded: loaded (/etc/init.d/lirc)
   Active: active (running) since Sat 2018-11-17 07:49:25 CET; 23s ago
  Process: 1137 ExecStop=/etc/init.d/lirc stop (code=exited, status=0/SUCCESS)
  Process: 1173 ExecStart=/etc/init.d/lirc start (code=exited, status=0/SUCCESS)
   CGroup: /system.slice/lirc.service
           mq1180 /usr/sbin/lircd --driver=default --device=/dev/lirc0

Nov 17 07:49:25 orangepizero lirc[1173]: Loading LIRC modules:.
Nov 17 07:49:25 orangepizero lircd-0.9.0-pre1[1180]: lircd(default) ready, us...
Nov 17 07:49:25 orangepizero lirc[1173]: Starting remote control daemon(s) :....
Nov 17 07:49:25 orangepizero systemd[1]: Started LSB: Starts LIRC daemon..
Nov 17 07:49:41 orangepizero systemd[1]: Started LSB: Starts LIRC daemon..
Hint: Some lines were ellipsized, use -l to show in full.

$ sudo reboot

リモコンの確認

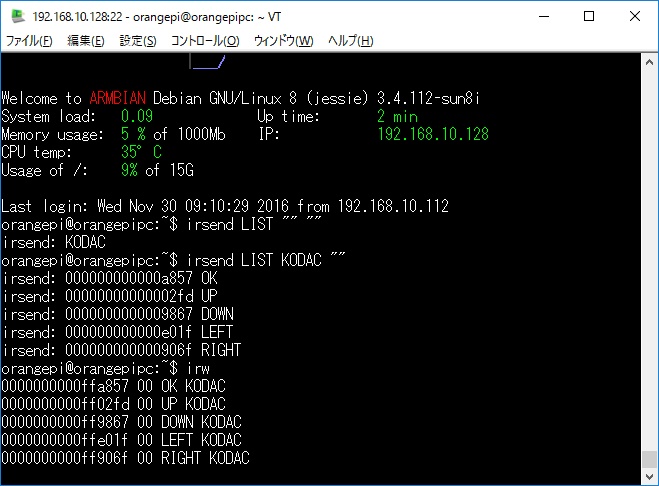
再起動すると以下のコマンドでリモコンの登録状況を確認することができます。
$ irsend LIST "" ""
irsend: KODAC

$ irsend LIST KODAC ""
irsend: 000000000000a857 OK
irsend: 00000000000002fd UP
irsend: 0000000000009867 DOWN
irsend: 000000000000e01f LEFT
irsend: 000000000000906f RIGHT
irsend: 000000000000a25d TOP-LEFT
irsend: 000000000000629d TOP-CENTER
irsend: 000000000000e21d TOP-RIGHT

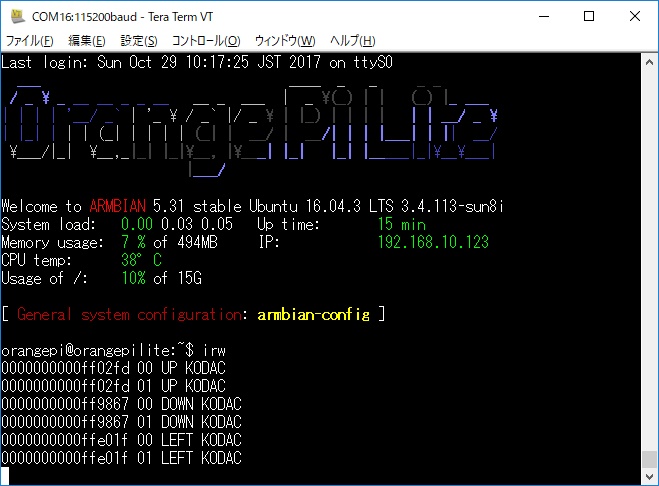
また、以下のコマンドでリモコンが認識されるか確認することができます。
irw を起動してリモコンを発射し、以下が表示されれば完了です。

リモコンでのコマンド実行

サンプルとして以下の2つのシェルファイルを作ります
オンボード上のLEDをLチカするシェルです。

/home/orangepi/RedLed.sh
#!/bin/bash
modprobe gpio_sunxi
for i in {1..10}
do
sh -c "echo 1 > /sys/class/leds/red_led/brightness"
sleep 1
sh -c "echo 0 > /sys/class/leds/red_led/brightness"
sleep 1
done

/home/orangepi/YellowLed.sh
#!/bin/bash
modprobe gpio_sunxi
for i in {1..10}
do
sh -c "echo 1 > /sys/class/leds/green_led/brightness"
sleep 1
sh -c "echo 0 > /sys/class/leds/green_led/brightness"
sleep 1
done

「/etc/lirc/lircrc」 を以下の内容で作ります。
begin
 button = UP
 prog   = irexec
 config = sudo /home/orangepi/RedLed.sh
end

begin
 button = DOWN
 prog   = irexec
 config = sudo /home/orangepi/YellowLed.sh
end

リモコンでsudoコマンドを実行する場合は、ユーザがパスワードなしでsudoできるようにしておく必要があります。
これをしないと、sudoコマンドを実行したときにパスワード入力待ちになってしまいます。
こちらの手順で、パスワードの入力無しにsudoコマンドを実行で きるよう になります。

ここまで準備ができたら、以下のコマンドを実行します。
$ irexec /etc/lirc/lircrc

リモコンのボタンを押すと、オンボードのLEDがLチカします。
irexecは「/etc/lirc/lircrc」が有れば、OS起動時にデーモンとして常駐します。
私はもっぱらRebootとShutdownをリモコンで行っています。
これ以降はDebian jessieと同じです。
リモコンの学習が終わったら、irw を起動してリモコンを発射し、以下が表示されれば完了です。


次回は「Debian Stretch」での赤外線受信を紹介します。