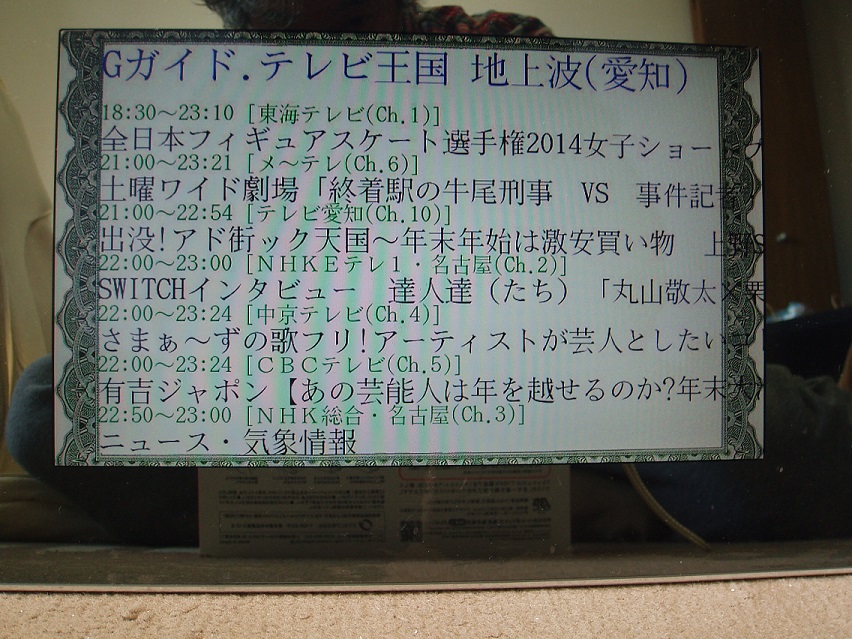
デジタルフォトフレームを簡易モニターとして使う

テレビ番組表


前回はデジタルフォトフレームを電子看板として利用する方法を 紹 介しました。
今回はWEBページから必要な情報を抜き出してフォトフレームに表示するサンプルとして、
so-netのG ガイド・テレビ王国から、現在放送中の番組表 を抜き出してフォトフレームに表示する方法を紹介します。
so-netのGガイド・テレビ王国はXML形式で表示されるので、コンピュータで定型処理を行うには便利です。

【STEP1】パッケージのインストール

以下のパッケージをインストールします。
Beautiful Soupは、HTMLファイルやXMLファイルからデータを抽出するためのPythonライブラリです。
WEBページから情報を抜き出すときには必須のライブラリです。
詳しい使い方は、色々なところで公開されています。
$ sudo apt install python3-pip python3-setuptools fonts-takao imagemagick
$ python3 -m pip install -U pip
$ python3 -m pip install beautifulsoup4
$ python3 -m pip install requests

【STEP2】pythonスクリプト

WEBページから番組表を抜き出すスクリプトは以下のとおりです。
BeautifulSoupのfindやfind_allを使って、必要なタグだけを抜き出しています。
スクリプトの以下の部分はお住まいの地域にあわせて変更してください。
city='23' # 東京

この番号の調べ方ですが
http://tv.so-net.ne.jp/rss/schedulesByCurrentTime.action?group=10&stationAreaId=33
上記のURLをブラウザーで開いて、末尾の番号を適当な数字に変えてみてください。
#!/usr/bin/python3
#-*- encoding: utf-8 -*-
import sys
import os
import csv
import requests
from bs4 import BeautifulSoup
import unicodedata

'''
sudo apt install python3-pip python3-setuptools
python3 -m pip install -U pip
python3 -m pip install beautifulsoup4
python3 -m pip install requests

'''

if __name__ == '__main__':
    argv = sys.argv  # コマンドライン引数を格納したリストの取得
    argc = len(argv) # 引数の個数

    #番組情報取得
    city='23' # 東京
    #city='40' # 大阪
    #city='33' # 名古屋

    #url = 'http://www.tvguide.or.jp/TXML301PG.php?type=TVG&dummy=10&regionId={0:s}'.format(city)
    #url = 'http://tv.so-net.ne.jp/rss/schedulesByCurrentTime.action?group=10&stationAreaId=33'
    url = 'http://tv.so-net.ne.jp/rss/schedulesByCurrentTime.action?group=10&stationAreaId={0:s}'.format(city)
    print("url={}".format(url))
    response = requests.get(url)
    soup = BeautifulSoup(response.text, "html.parser")

    header = soup.find("title").get_text()
    print("header={}".format(header))

    title_list = []
    counter = 0
    for title in soup.findAll("title"):
        counter = counter + 1
        if (counter == 1):continue
        print("title={}".format(title.get_text()))
        title_list.append(title.get_text())

    description_list = []
    counter = 0
    for description in soup.findAll("description"):
        counter = counter + 1
        if (counter == 1):continue
        print("description={}".format(description.get_text()))
        description_list.append(description.get_text())

    for index in range(len(title_list)):
        print("{} {}".format(description_list[index], title_list[index]))

上記のコードを実行すると、必要なタグだけを抜き出して表示します。
これを変更して、必要な情報だけをファイルに記録します。
#!/usr/bin/python3
#-*- encoding: utf-8 -*-
import sys
import os
import csv
import requests
from bs4 import BeautifulSoup

'''
sudo apt install python3-pip python3-setuptools
python3 -m pip install -U pip
python3 -m pip install beautifulsoup4
python3 -m pip install requests

'''

if __name__ == '__main__':
    argv = sys.argv  # コマンドライン引数を格納したリストの取得
    argc = len(argv) # 引数の個数
    #print("argc={}".format(argc))
    csv_file = argv[1]
    #print("csv_file={}".format(csv_file))

    #テストモード設定
    TestMode=""
    if argc == 3:
        if argv[2] == "test":
            TestMode="test"

    #フォントサイズなど
    #適当に変更してください
    FontSizeHeader="45"
    FontStyleHeader="M"
    FillColorHeader="DarkBlue"

    FontSizeDesc="25"
    FontStyleDesc="G"
    FillColorDesc="DarkGreen"

    FontSizeTitle="33"
    FontStyleTitle="M"
    FillColorTitle="Black"

    #CSVファイル作成
    fd=open(csv_file,'w')
    writer = csv.writer(fd, lineterminator='\n')
    csvdata = []

    #www.tvguide.or.jpから番組情報取得
    city='23' # 東京
    #city='40' # 大阪
    #city='33' # 名古屋

    #url = 'http://www.tvguide.or.jp/TXML301PG.php?type=TVG&dummy=10&regionId={0:s}'.format(city)
    #url = 'http://tv.so-net.ne.jp/rss/schedulesByCurrentTime.action?group=10&stationAreaId=33'
    url = 'http://tv.so-net.ne.jp/rss/schedulesByCurrentTime.action?group=10&stationAreaId={0:s}'.format(city)
    #print("url={}".format(url))
    response = requests.get(url)
    soup = BeautifulSoup(response.text, "html.parser")

    header = soup.find("title").get_text()
    #print("header={}".format(header))
    header_list = header.split('-')
    #print("header_list={}".format(header_list))
    header = header_list[0].strip(' ')
    header = header + " - " + header_list[2].strip(' ')
    #print("header={}".format(header))

    #ヘッダー
    csvdata=[]
    csvdata.append(header)
    csvdata.append(FontSizeHeader)
    csvdata.append(FillColorHeader)
    csvdata.append(FontStyleHeader)
    writer.writerow(csvdata)

    #改行
    csvdata=[]
    csvdata.append(' ')
    csvdata.append(FontSizeDesc)
    csvdata.append(FillColorDesc)
    csvdata.append(FontStyleDesc)
    writer.writerow(csvdata)


    title_list = []
    counter = 0
    for title in soup.findAll("title"):
        counter = counter + 1
        if (counter == 1):continue
        #print("title={}".format(title.get_text()))
        title_list.append(title.get_text())

    description_list = []
    counter = 0
    for description in soup.findAll("description"):
        counter = counter + 1
        if (counter == 1):continue
        #print("description={}".format(description.get_text()))
        description_list.append(description.get_text())

    for index in range(len(title_list)):
        if TestMode:
            print("{} {}".format(description_list[index], title_list[index]))
        csvline = "{}".format(description_list[index])
        csvdata=[]
        csvdata.append(csvline)
        csvdata.append(FontSizeDesc)
        csvdata.append(FillColorDesc)
        csvdata.append(FontStyleDesc)
        writer.writerow(csvdata)

        csvline = "{}".format(title_list[index])
        csvdata=[]
        csvdata.append(csvline)
        csvdata.append(FontSizeTitle)
        csvdata.append(FillColorTitle)
        csvdata.append(FontStyleTitle)
        writer.writerow(csvdata)

【STEP3】pythonスクリプトの実行

スクリプト起動時の最初の引数は作成するファイル名です。
2番目の引数に「test」を指定すると、ファイルに書き出す内容を表示します。
$ python3 tv-guide.py param.csv test
5/11 8:00〜10:25 [日テレ(Ch.4)] スッキリ[字][デ]【消えたハネムーン費 総額1300万円…旅行会社社長を直撃】
5/11 8:00〜9:55 [テレビ朝日(Ch.5)] 羽鳥慎一モーニングショー[字]
5/11 8:00〜9:55 [TBS(Ch.6)] ラヴィット! 日本でいちばん明るい朝番組[字]
5/11 8:00〜9:50 [フジテレビ(Ch.8)] めざまし8【金返せ!消えたハネムーン代金新婦怒り社長ドロン▽バイク停め威嚇】[字][デ]
5/11 8:00〜8:30 [TOKYO MX1(Ch.9)] 明日も晴れ ★第57話〔字幕スーパー〕
5/11 8:10〜8:25 [NHKEテレ1・東京(Ch.2)] いないいないばあっ! 水曜日[字]
5/11 8:15〜9:55 [NHK総合1・東京(Ch.1)] あさイチ「太りにくい食べ順・姿勢・好き嫌い 食事に役立つ“食テク”」[字]
5/11 8:15〜9:11 [テレビ東京(Ch.7)] 韓流プレミア 風と雲と雨 第7話[二]

同時にカレントディレクトリに「param.csv」のファイルを作ります。
$ cat param.csv
Gガイド.テレビ王国 - 地上波(東京),45,DarkBlue,M
 ,25,DarkGreen,G
5/11 8:00〜10:25 [日テレ(Ch.4)],25,DarkGreen,G
スッキリ[字][デ]【消えたハネムーン費 総額1300万円…旅行会社社長を直撃】,33,Black,M
5/11 8:00〜9:55 [テレビ朝日(Ch.5)],25,DarkGreen,G
羽鳥慎一モーニングショー[字],33,Black,M
5/11 8:00〜9:55 [TBS(Ch.6)],25,DarkGreen,G
ラヴィット! 日本でいちばん明るい朝番組[字],33,Black,M
5/11 8:00〜9:50 [フジテレビ(Ch.8)],25,DarkGreen,G
めざまし8【金返せ!消えたハネムーン代金新婦怒り社長ドロン▽バイク停め威嚇】[字][デ],33,Black,M
5/11 8:00〜8:30 [TOKYO MX1(Ch.9)],25,DarkGreen,G
明日も晴れ ★第57話〔字幕スーパー〕,33,Black,M
5/11 8:10〜8:25 [NHKEテレ1・東京(Ch.2)],25,DarkGreen,G
いないいないばあっ! 水曜日[字],33,Black,M
5/11 8:15〜9:55 [NHK総合1・東京(Ch.1)],25,DarkGreen,G
あさイチ「太りにくい食べ順・姿勢・好き嫌い 食事に役立つ“食テク”」[字],33,Black,M
5/11 8:15〜9:11 [テレビ東京(Ch.7)],25,DarkGreen,G
韓流プレミア 風と雲と雨 第7話[二],33,Black,M


出来上がったパラメータファイル(param.csv)を使って、前回と同様の手順でイメージファイルを作成し、
イメージファイルをフォトフレーム側にダウンロードしてやれば、フォトフレームに番組表を表示することができます。

【STEP4】全体のシェルスクリプト

cronで定期的に以下のスクリプトを実行すれば、フォトフレームに定期的に番組表を表示することができます。
USB-SWは/sys/class/gpioを使ってON/OFFしています。
#!/bin/bash
#
# TV guide for Raspberry
#
#set -x

function _logger() {
    sudo sh -c "echo $1 >  /dev/kmsg"
}

_logger 'Start tv-guide'
ParamFile=/home/pi/tv-guide/param.csv
python3 /home/pi/tv-guide/tv-guide.py ${ParamFile}
InFile=/home/pi/tv-guide/frame0078.jpg
OutFile=/tmp/image00.jpg

Vertical=50
#水平位置は適当に変更してください
Horizontal=50
TmpFile=$(mktemp)
cp $InFile $TmpFile

#パラメータファイル読み込み
cat ${ParamFile} | while read line
do
  col0=`echo ${line} | cut -d , -f 1`
  col1=`echo ${line} | cut -d , -f 2`
  col2=`echo ${line} | cut -d , -f 3`
  col3=`echo ${line} | cut -d , -f 4`
  if test "$col3" = "" ; then
    col3="M"
  fi

#イメージに文字を挿入
  Vertical=`expr ${Vertical} + ${col1}`
  if test $col3 = "G" ; then
#    convert -font /usr/share/fonts/truetype/kochi/kochi-gothic.ttf -pointsize ${col1} -fill ${col2} -draw "text ${Horizontal},${Vertical} '${col0}'" $TmpFile $OutFile
    convert -font /usr/share/fonts/truetype/takao-mincho/TakaoMincho.ttf -pointsize ${col1} -fill ${col2} -draw "text ${Horizontal},${Vertical} '${col0}'" $TmpFile $OutFile
  else
#    convert -font /usr/share/fonts/truetype/kochi/kochi-mincho.ttf -pointsize ${col1} -fill ${col2} -draw "text ${Horizontal},${Vertical} '${col0}'" $TmpFile $OutFile
    convert -font /usr/share/fonts/truetype/takao-mincho/TakaoPMincho.ttf -pointsize ${col1} -fill ${col2} -draw "text ${Horizontal},${Vertical} '${col0}'" $TmpFile $OutFile
  fi
  cp ${OutFile} ${TmpFile}
done

#デバイスファイルとマウントポイント
device="/dev/sda1"
mpoint="/mnt/sdcard"

#USB-SWのON
_logger "USB ON"
GPIO=11

for i in `seq 1 30`
do
    sudo sh -c "echo ${GPIO} > /sys/class/gpio/export"
    sudo sh -c "echo out > /sys/class/gpio/gpio${GPIO}/direction"
    sudo sh -c "echo 1 > /sys/class/gpio/gpio${GPIO}/value"
    sleep 20

#フォトフレームの内蔵メモリのマウント
    #sudo mount -t vfat /dev/sda1 /mnt/sdcard
    sudo mount -t vfat ${device} ${mpoint}

#マウントチェック
    Check=`df | grep -c ${mpoint}`
    if test $Check -eq 1 ; then
        break;
    fi
    sleep 10
done

#SD Card内のImageファイルを削除
files=`find ${mpoint} -name "*.jpg" -print`
if test -n "$files" ; then
    sudo rm ${mpoint}/*.jpg
fi

#新しいファイルをコピー
#sudo cp /tmp/image00.jpg /mnt/sdcard
sudo cp ${OutFile} ${mpoint}
sync
sync
sync

#SD Cardのアンマウント
_logger "Umount disk"
#sudo umount -l /dev/sda1
sudo umount -l ${device}

#USB-SWのOFF
_logger "USB OFF"
sudo sh -c "echo 0 > /sys/class/gpio/gpio${GPIO}/value"
sudo sh -c "echo ${GPIO} > /sys/class/gpio/unexport"

#ファイルの削除
rm ${TmpFile}

フォトフレームへの表示は以下の様になります。


次回はもう1例、WEBページから必要な情報を抜き出してフォトフレームに表示するサン プルを紹介します。